

Video is a powerful way to communicate with your customers. Based on recent data, video is the highest engaging digital content for most brands. However, generating videos can be tedious. Especially when you have thousands of users to send to.
Gladly it doesn't have to be that way when you can code. In this tutorial, I will show you how we automated 1,000 personalized birthday wish videos adding names and details of the user and how you can automate video editing with code.
Perquisites
Node.js
We'll assume you have some experience with JavaScript. I'll use vanilla JavaScript through Node.js to build the application, but feel free to use what works for you.
Shotstack API Key
Shotstack.io is a video editing API that uses REST architecture using JSON to describe video data. The API supports complex video editing capabilities. Create a free account to get the API key. See the full documentation and API reference at shotstack.io/doc/guide
Selecting A Footage
This tutorial uses a standard promotional video that offers our fictitious customers a discount on their birthday. This video has been completely generated with code, but you can achieve the same result using a pre-rendered video built in a video editing solution such as After Effects.
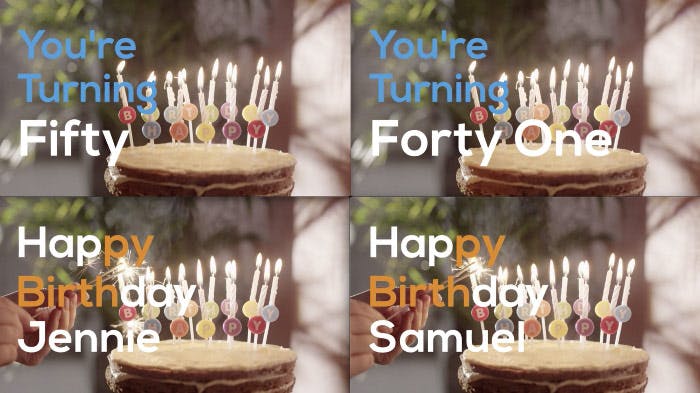
We'll remove some of the video's content, and use those empty spaces for our personalized data. This data will be placed into a JSON file, and will place back all of those missing items with new values and animations.
For this particular template we'll personalize the name, age, their younger "fake" age, the discount code, and the discount amount.
Shotstack uses a JSON object that acts like an editable timeline. This works in a similar fashion to how any desktop video editing solution would work, with a timeline representing the video duration, and individual clips allowing you to manipulate its content.
For this article I won't go into how this video was built, but if you're interested in understanding how this particular video was edited you can take a closer look at the JSON template. And if you're really keen this tutorial goes a little deeper into how you can design these videos yourself.
For this example we'll use a simplified template where the animations have been pre-rendered, making it easy for us to add in specific HTML assets where our personalized content should go:
{
  "timeline": {
    "fonts": [
      {
        "src": "https://shotstack-assets.s3-ap-southeast-2.amazonaws.com/fonts/FiraCode-Regular.ttf"
      },
      {
        "src": "https://shotstack-assets.s3-ap-southeast-2.amazonaws.com/fonts/Nexa-Bold.otf"
      }
    ],
    "background": "#000000",
    "tracks": [
      {
        "clips": [
          {
            "asset": {
              "type": "html",
              "html": "<p>firstName</p>",
              "css": "p { font-family: \"Nexa Bold\"; font-size: 128px; color: #ffffff; text-align: left; }"
            },
            "start": 2.35,
            "length": 1.45,
            "offset": {
              "y": -0.23,
              "x": 0.05
            },
            "transition": {
              "out": "carouselDown"
            }
          },
          {
            "asset": {
              "type": "html",
              "html": "<p><b>age</b></p>",
              "css": "p { font-family: \"Nexa Bold\"; font-size: 149px; color: white; text-align: left; }"
            },
            "position": "center",
            "start": 5.2,
            "length": 1.3,
            "offset": {
              "y": -0.23,
              "x": 0.05
            },
            "transition": {
              "in": "zoom",
              "out": "zoom"
            }
          },
          {
            "asset": {
              "type": "html",
              "html": "<p><b>fakeAge</b></p>",
              "css": "p { font-family: \"Nexa Bold\"; font-size: 384px; color: #ffffff; text-align: left;}"
            },
            "position": "center",
            "start": 11.15,
            "length": 2.5,
            "offset": {
              "y": -0.05,
              "x": 0.05
            },
            "transition": {
              "out": "carouselLeft"
            }
          },
          {
            "asset": {
              "type": "html",
              "html": "<p>discountCode</p>",
              "css": "p { font-family: \"Fira Coda\"; font-size: 42px; color: #3498db; text-align: center; background-color: #ffffff; padding: 32px; line-height: 106px; }",
              "width": 320,
              "height": 107
            },
            "start": 17.2,
            "length": 4.8,
            "offset": {
              "y": -0.05,
              "x": 0
            }
          },
          {
            "asset": {
              "type": "html",
              "html": "<p>For discount Off</p>",
              "css": "p { font-family: \"Nexa Bold\"; font-size: 58px; color: #3498db; text-align: left;} span { color: #e74c3c; }"
            },
            "start": 19.2,
            "length": 1.2,
            "offset": {
              "y": -0.302,
              "x": 0.04
            }
          },
          {
            "asset": {
              "type": "html",
              "html": "<p>For <span>discount Off</span></p>",
              "css": "p { font-family: \"Nexa Bold\"; font-size: 58px; color: #3498db; text-align: left;} span { color: #e74c3c; }"
            },
            "start": 20.3,
            "length": 1.7,
            "offset": {
              "y": -0.302,
              "x": 0.04
            }
          }
        ]
      },
      {
        "clips": [
          {
            "asset": {
              "type": "video",
              "src": "https://shotstack-content.s3-ap-southeast-2.amazonaws.com/birthday/birthday-template.mp4",
              "volume": 1
            },
            "start": 0,
            "length": 22
          }
        ]
      }
    ]
  },
  "output": {
    "format": "mp4",
    "resolution": "sd"
  }
}
Bulk Automate Edit Using Spreadsheet
For our customers we'll use a dataset with information on about 1,000 concocted users. This will include their name, age, fake age, their discount code, and the discount amount. We will then use the data in this CSV to fill in the JSON template and send it to the API. You can find the complete spreadsheet on GitHub.
Create videos from CSV data
The only thing you need to do now is iterate over the CSV file, add those personalised datapoints to the JSON template, and send each video edit to the API for rendering.
The below script works using an .env environment file with the Shotstack API key details in it. You can take a look at my .env file to see how we can use environment variables in our script.
require("dotenv").config();

const fs = require("fs");
const axios = require("axios").default;
const csv = require("fast-csv");
const argv = require("yargs").argv;
const numWords = require("num-words");
const getAge = require("get-age");
const capitalize = require("capitalize");
const Throttle = require("throttle-stream");

const USER_LIST = "./user-list-test.csv";
const VIDEO_LIST = "./video-list.csv";
const API_KEY = process.env.SHOTSTACK_KEY;
const ENDPOINT = process.env.SHOTSTACK_ENDPOINT;
const CUSTOMER_ID = process.env.SHOTSTACK_CUSTOMER_ID;
const PREVIEW_URL = process.env.SHOTSTACK_PREVIEW_URL;
const TEMPLATE = fs.readFileSync("./template.json", "utf8");
const fileStream = fs.createWriteStream(VIDEO_LIST, { flags: "a" });

let count = 0;

fs.createReadStream(USER_LIST)
  .pipe(new Throttle({ bytes: 200, interval: 1000 }))
  .pipe(csv.parse())
  .on("data", (row) => {
    let age = getAge(row[1]);
    let ageInWords = capitalize.words(numWords(age));

    var mapObj = {
      firstName: row[0],
      age: ageInWords,
      fakeAge: row[2],
      discountCode: row[3],
      discount: row[4],
    };

    let template = JSON.parse(
      JSON.stringify(TEMPLATE).replace(
        /firstName|age|fakeAge|discountCode|discount/gi,
        function (matched) {
          return mapObj[matched];
        }
      )
    );

    axios({
      method: "post",
      url: ENDPOINT,
      headers: {
        "x-api-key": API_KEY,
        "content-type": "application/json",
      },
      data: template,
    }).then(
      (response) => {
        if (response.status !== 201) {
          console.log(row[0], response.data.response.id);
          return;
        }

        let video = response.data.response.id + ".mp4";
        fileStream.write(`${row[0]},${PREVIEW_URL}${CUSTOMER_ID}/${video}\n`);
        console.log("Video queued for: " + row[0]);
      },
      (error) => {
        throw error;
      }
    );
  });
The result - 1000 personalized videos rendered within few minutes
Once you run the script you'll see all thousand personalized templates be sent through to the API for rendering, and all output data will end up in a CSV file called video-list.csv, which will include the URLs for each individual video. Image for post
Ready To Build?
Videos have been playing a major role in amplifying our communication in this digital world. No doubt about that. The next big thing will be automated personalized videos. Personalized marketing videos have already proven to be the future of videos with higher conversion and engagement rates in marketing. What are you doing building to take advantage of this movement?
Visit our Templates page to get started with different templates for various use cases